Monday, March 23, 2015

Some Pretty Big News...

Dreams do come true!

I've recently been pretty busy with the 2015 CaRMS match - tons of work, perseverance, flying to 8 different interviews... but the Match results are in!

Say hello to the newest  Pediatric Resident at CHEO!

Absolutely ecstatic! Cannot wait to begin.

Until then, I'll be doing some last minute crafts (I've started my spring decorating!). I'm also going to do a week-long segment on CaRMS as an IMG. I've been asked so many questions over the years, and if it can help anyone out in my position, I'm happy to do it.

More to come,


Cara xox

Friday, December 19, 2014

Christmas Gingerbread Cookies!

Whipped up a few of these soft, chewy, spicy bites for a Christmas party!


Here is the recipe (Beware: My husband has found a new love... these cookies!)

Ingredients
3  cups all purpose flour
1  1/2  tsp baking powder
3/4  tsp baking soda
1/4  tsp salt
1  tbsp ground ginger
1  3/4  tsp ground cinnamon
1/4  tsp ground cloves
6  tbsp unsalted butter (softened)
3/4  cup dark brown sugar
1 large egg
1/2  cup molasses
2  tsp vanilla
1  tsp finely grated lemon zest (optional)

Directions
In small bowl, mix all dry ingredients together (flour, baking powder, baking soda, salt, ginger, cinnamon and cloves). Put aside.

In a large bowl, beat egg, butter and brown sugar together until well blended. Mix in molasses, vanilla and lemon zest.

Gradually add the dry ingredients to the wet, mixing until smooth. It is easiest to mix with your hands - the dough is quite dry and thick (difficult to mix)

Divide the dough in half, and cover in plastic wrap.

Let stand at room temperature for minimum 2 hours, or in fridge overnight. Allow dough to come to room temperature before using it.

Preheat oven to 375 degrees. Line baking sheets with parchment paper.

Roll out dough onto parchment paper. I like to keep the dough nice and thick so that they are chewy. If you prefer crunchy cookies, roll out the dough thinly.

Cut out desired shape, space out on tray at least once inch apart from each other.

Bake 6-7 minutes (thick cookies) or until the edges are slightly brown.

Allow to cool on a rack until at room temperature. Ice when cooled.
(I use the same recipe for the icing as the Sugar Cookies - click here for link)


Since it's the holidays, go nuts and add sparkles, sprinkles, all sorts of fun decorations!
Yum yum, now enjoy!


Cara xox

The Tree - Our Beautiful 7-Foot Frasier Fir

Yes, the real tree has been up for about a month. So... it's about time I posted some of the photos! (Again, not professional, so please bear with me!)


This year, as it is our First Christmas as a married couple - we had almost NO ornaments! So we chose to invest in a few beautiful pieces, go cheap for a few others, and then make a few as well! We also received a few very special ornaments as gifts!

Tree Skirt - Made by Moi (see other post)
Tree Holder - Canadian Tire (actually was very impressed - quite sturdy!)
Lights - 750 white lights (Walmart)
Ribbon - Gold sparkle and Burlap with Gold Reindeer (Michael's)

Tree topper - made from Gold sparkle ribbon (attached loops of ribbon to popsicle sticks, then stuck them into the tree until the bow looked full - they are not a single ribbon! But doesn't it look like a pretty present?


Our Special Ornaments (From Tinseltown in Ottawa, on Wellington St.). We each chose one special ornament to add to the tree (the pink one is obviously mine!)

4 Mercury Drop ornaments
4 White snowflakes
1 Globe ball
1 Pink Rosette ball

Gifts:
The "W" and "R" - Chapters/Indigo
The Gold Snowflake - a gift from my cousin Leah!


Our Basic Ornaments:
White Opaque balls (Michael's)
Gold Stripe (Homesense)
Clear balls (the Bay)
Gold (the Bay)
Silver opaque (Homesense)
Light Blue balls (bought at the Glebe Emporium in 2007!)
Silver Icicles (the Bay)
Ceramic White Reindeer (the Bay)


Homemade Ornaments
Pinecones with Ribbon
Sparkle Balls (Made by swirling Pledge floor wax into crafting ornaments and pouring in some glitter! Super easy and inexpensive)
 - Colours: gold, silver, dark green and pink

The Balls are much more sparkly in person...


And what would the perfect tree be without a Custom Hot Chocolate Bar???

Butlers - The Best Irish Chocolate (we found it at Homesense! Saving it...)
Bar complete with White and Milk chocolate, Chai, Peppermint, Marshmallows, Nespresso,
Milk Frother, Whipped Cream, Cinnamon, and Vanilla and Chocolate Sprinkles 


Happy Holidays Everyone!
Hope you have all gotten into the Christmas Spirit!


Cara xox

Tuesday, December 2, 2014

Living Room Christmas Crafts - Burlap Ruffle Tree Skirt

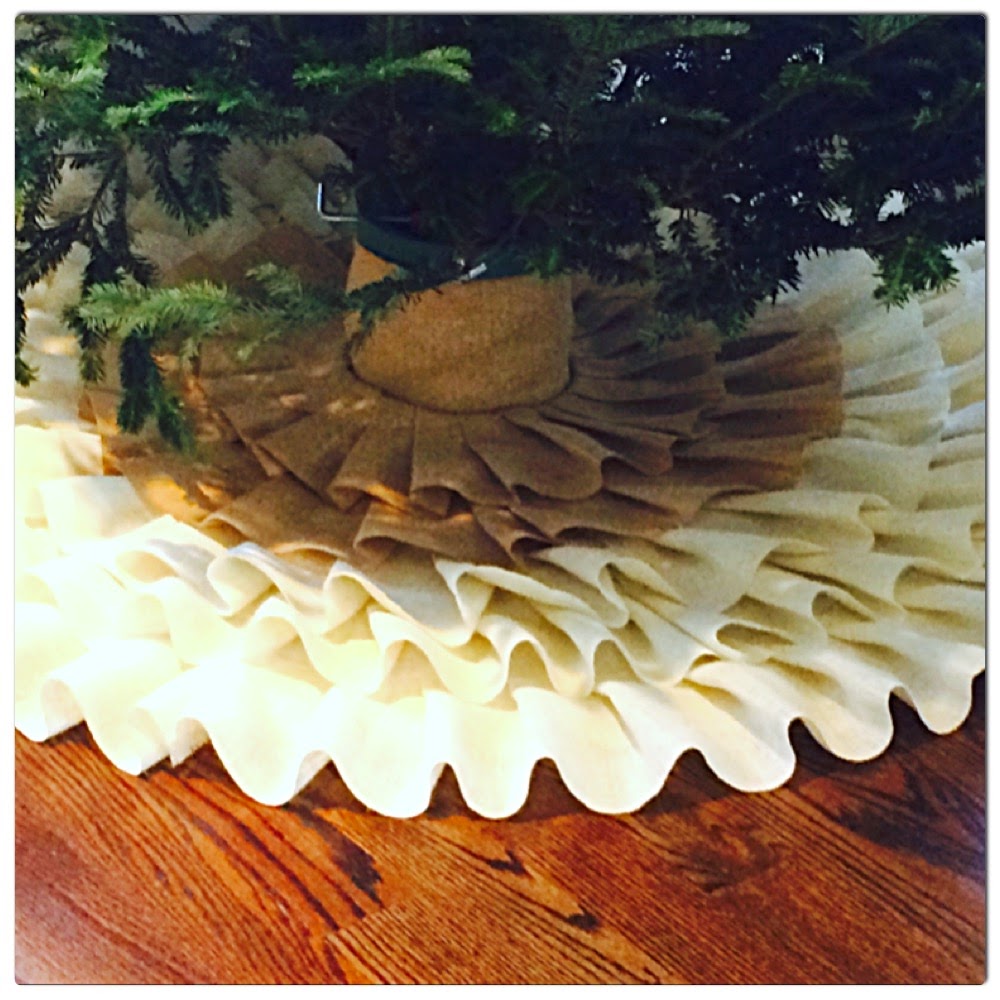
Yes, I have joined the countless Pinterest crafters who have made a Burlap Ruffle Tree Skirt. Considering that they sell on Etsy for up to  $175.00 (or more!), I'm quite proud of my accomplishment!

Here is the finished Product:


What you will need:

A large Workspace (Our round kitchen table worked perfectly!)
White or Off-white felt (at least 50inches x 50 inches) - mine was purchased at Fabricland (having lots of Christmas sales!)
White Burlap (I used 2 yards)
Natural Burlap (1 used 0.5 yards)
Scissors
Measuring tape (best if flexible)
Pen/marker
Sewing Seam Ripper (Is that what they are called?) 
Sewing pins (at least 30)
Glue gun
Glue gun Sticks (LOTS! I went through about 40 mini ones)
Twine or Ribbon

How to Make:

1. Fold your felt. You want to fold it in half, then in half again (should look like a square-isn thing).
Locate the two edges with the fold - these will be the sides that you will keep intact.

2. Decide how big you want your tree skirt to be. Typically, they average around 45 - 60 inches in diameter. My felt piece was 50 inches in diameter, then the burlap hung off the edge another 3-4 inches (making the total almost 60inches).
Divide your total diameter in 2. Pin your tape measure in the corner of your felt piece (the corner that hosts both folded areas). Use the pic as a pivot - measure out the arc of a circle (see picture below). My arc was 25 inches long. Mark the measurement with a pen/marker lightly.

You also want to measure out a circle in the middle of your felt for the tree holder to go. Measure your holder, and plan accordingly. Mine was 4 inches, and I allowed 0.5 inches for extra room.

3. Cut your two arcs. I pinned my layers of felt together before cutting to make sure the layers all stayed together.

Cut down one of the fold of your fabric to the centre of the circle. This will be the opening to put it on the tree. (See pictures)


4. Get ready to have burlap fluff everywhere.

5. Cut your pieces of burlap. My pieces were 7 inches wide (considerable wider than some of the other skirts seen on Pinterest) - this will give a wider stripe.

If you are like me, and get frustrated by the fraying of burlap, here is the trick to eliminating fray:
Measure out your desired width. Use a seam picker (ripper?) to cut through one "thread" of burlap - the one that corresponds to your desired width. Use the seam ripper to remove the entire thread from the entire length of the burlap.

Once finished, cut the burlap in the new space you have just created. This will help keep it from fraying!


6. Pin out your ruffles onto your fabric. Start with the outside and work your way in. Measure out how many layers you want, and you can mark them off if you wish.

7. Once a layer is pinned, use the glue gun to paste the layers to the felt. Watch those fingers! It will be very hot!

8. Go around the whole circle, until finished. Go onto the next layer (pinning then gluing). Feel free to alternate colours or fabrics! Make your own design!

9. When you get to the middle, ensure that you pin and glue your fabric pieces with overhang into the middle of the felt circle. Once your front is complete, flip your skirt over and pin the overhanging bits to the underskirt for a clean finish.


10. Complete the look with some twine or ribbon to tie the two openings together. I used glue to secure mine in place, but you can either cut slits into the sides and tie the twine in, or you can even buy eyelets at the fabric store. I knew mine wouldn't get too much use, so gluing them in place was enough for me.

11. Sit back and admire your work! Wow! Send pictures to everyone, post on Intagram. Place under your tree and enjoy.

Time for a glass of wine. Hope yours turned out well!
More pictures to come once we have decorated the tree!


Cara xox

Sunday, November 30, 2014

Living Room Christmas Craft - Centrepiece


Here is another centrepiece that is very easy to make.  You can pick what you'd like to have in them - mine is inspired from something I saw on Pinterest.

What you need:

3 Glass jars with lids of varying sizes (mine are from HomeSense)
Metal Tray (or wood, glass, marble)
Pinecones (some of mine are painted with gold paint and glitter)
Small votive candles
Small ornaments
Pine garland
Toy Reindeer to decorate tray

Inside my Three Jars:
(1) Toy polar bear cub (Michael's), Small white brush trees (Dollarama), fake snow (Dollarama)
     - My cub kept sinking, so I glued him to a piece of white cardboard to increase his surface area

(2) Reindeer ornament (The Bay), Gold beads (Mine are cut from a string of beads - Dollarama)

(3) Christmas balls or varying golds and silvers, varying sizes (Dollarama)


Living Room Christmas Craft - Coffee Table Box


This is an extremely easy way to make a nice centrepiece. Collect a few things you have around the house, add a few Christmas items, and Voila! A box that looks very put-together!

In our Box:

A gold glitter Reindeer    (Bought at a Christmas Market)
White candles of varying heights    (Bought at IKEA)
3 Ashland "Christmas Tree" Candles    (These are incredible! When lit, they make the entire house smell like pine. Just be careful when lighting candles around greenery - high fire hazard! Make sure flames are protected.)
Small gold ornaments
Pinecones    (Gathered from our backyard, and at the cabin)
Pine Garland    (You could substitute real branches from your Christmas tree, but ours are from Michaels' craft store)

It also holds our Coasters tucked away in the corner (gray slate squares)

The box itself is a breakfast tray that I flipped upside down, then removed the legs! It was an off-green colour, so I spray painted it with Rust-Oleum Almond paint to give it a more Vintage White feel.

Living Room Christmas Crafts - Gold Soldiers and Christmas Trees


Gold Soliders

These were purchased at Michaels - they are wooden and are made for painting.
I used Krylon Gold Metallic spray paint - but in real life, they look slightly bronze. If you'd prefer a REAL gold, I would suggest Rust-Oleum Gold Metallic spray paint.


Christmas Trees

These were made as all cone christmas trees are made! I used a large cone styrofoam old to get the basic shape, and used left-over cardboard to make the basic structure. Secure the cardboard in place with tape.

Cover the cardboard base with regular white printer paper or newspaper. I did this because white glue does not stick well to tape - makes it runny, and designs seem to slip off. I used White Glue to attach computer paper to the entire cone structure.

Then it's time to decorate!
My gold/silver shiny tree: 
Decor is made by mixing silver and gold sequins, silver and gold glitter and silver and oil foil decals in a bowl, then applying mixture to think white glue layer on cone.

Allow time to dry, then go back and add more sparkle to areas which were not well covered.
Sparkles will get everywhere! Be sure to keep a vacuum nearby so that you don't track them all over the house!

My white ball tree:
This was a time consuming project, but worth it! It was done using a glue gun, as opposed to regular White Glue.

Firstly, I covered the base of the tree in a silver ribbon - just to make the base a little more special.
I then added a small layer of glue to the base, along the top of the ribbon, followed by a few styrofoam balls.
The styrofoam balls were purchased at Dollarama - come in a pack of about 10,000 for 1.25$. They are of varied sizes, which gives depth to the tree!
Keep adding glue-then balls - then glue - then balls, until you have worked your way up the tree! For a 2 foot tree, it took about 2 hours!